If you have ever considered compiler development as a profession, you have definitely come face-to-face with a line in the job description that goes something like this
This blog post explores LLVM and provides a tutorial on how to use it to write a compiler for the APL programming language (code repository).

What is LLVM?#
LLVM was introduced in the paper “LLVM: A Compilation Framework for Lifelong Program Analysis & Transformation” in 2004. The paper argues for program analysis at various stages of a program’s lifetime. These analyses allow for 4 classes of optimizations
- Interprocedural: Those performed at link time, such as static debugging and static leak detection.
- Machine-Dependent: Those performed at install time.
- Dynamic: Those performed at runtime.
- Profile-Guided: Those performed between runs.
An LLVM-based compiler consists of a user-defined static frontend that converts the source language into an LLVM intermediate representation. It is expected that during this conversion, users will perform source-language-specific optimizations themselves, as LLVM will not preserve source-language semantics to exploit certain optimization opportunities. The linker then performs a series of link-time optimizations. The code is then compiled into a binary, and the LLVM representation is saved alongside it (it is also possible to JIT-compile the code). The binary contains instrumentation to extract profile data, which can be used to optimize at runtime.
The core of LLVM is the intermediate representation (IR). This IR is expected to be high-level enough to cover a wide range of optimizations and low-level enough to represent arbitrary programs. LLVM achieves this through a RISC-like instruction set that is only slightly more expressive than standard assembly. The additional features include
- A type system that can be used to implement data types and associated operations
- Instructions for performing type conversions and address arithmetic
- Two exception handling instructions (unwind and invoke)
The LLVM IR can be thought of as the assembly for an abstract machine with load-store architecture and infinite registers. The instruction set contains 31 opcodes, most of which are overloaded (add works on int and float types). To allow for easier analysis, each register has a type, and all operations are in Static single-assignment (SSA) form (meaning that each register is only written to once). The type of a register can be a primitive type (void, bool, signed/unsigned int of 8-64 bits, and single/double precision floating point) or a derived type (pointers, arrays, structures, and functions). Functions in LLVM consist of a set of basic blocks, where each block is a sequence of LLVM instructions that ends with one terminator (branches, return, unwind, or invoke). Exceptions in LLVM are handled through invoke and unwind. Invoke works similarly to a call instruction, with an additional specification of a basic block to execute in the event of an exception. The unwind starts popping stack frames till an invoke block is encountered.
LLVM has seen large-scale adoption across the industry. The popular C++ compiler clang is written using LLVM. To illustrate the LLVM IR, you can find below a small C++ program along with its associated LLVM IR (can be generated by running clang -S -emit-llvm <cpp-file-name>).
int main() {
  int arr1[] = {1, 2, 3};
  for (int i = 0; i < 3; ++i) {
    arr1[i] = 0;
  }
  return 0;
}
@__const.main.arr1 = private unnamed_addr constant [3 x i32] [i32 1, i32 2, i32 3], align 4

; Function Attrs: mustprogress noinline norecurse nounwind optnone ssp uwtable
define noundef i32 @main() #0 {
  %1 = alloca i32, align 4
  %2 = alloca [3 x i32], align 4
  %3 = alloca i32, align 4
  store i32 0, ptr %1, align 4
  call void @llvm.memcpy.p0.p0.i64(ptr align 4 %2, ptr align 4 @__const.main.arr1, i64 12, i1 false)
  store i32 0, ptr %3, align 4
  br label %4

4:                                                ; preds = %11, %0
  %5 = load i32, ptr %3, align 4
  %6 = icmp slt i32 %5, 3
  br i1 %6, label %7, label %14

7:                                                ; preds = %4
  %8 = load i32, ptr %3, align 4
  %9 = sext i32 %8 to i64
  %10 = getelementptr inbounds [3 x i32], ptr %2, i64 0, i64 %9
  store i32 0, ptr %10, align 4
  br label %11

11:                                               ; preds = %7
  %12 = load i32, ptr %3, align 4
  %13 = add nsw i32 %12, 1
  store i32 %13, ptr %3, align 4
  br label %4, !llvm.loop !6

14:                                               ; preds = %4
  ret i32 0
}
Now that we have discussed the basics of LLVM, the best way to understand these concepts is to build a small compiler using it. The following section of this blog post focus on that.
Tutorial#
The purpose of this tutorial is to familiarize readers with LLVM IR and, specifically, its code generation. So we will not touch on optimization passes or other components of the LLVM stack (hopefully a future blog post will). Since we’re going to build a compiler, the first step is to identify a language that our compiler should compile. The official LLVM tutorial develops a compiler for a fictitious language named Kaleidoscope. In this tutorial, I document the process of creating a compiler for the APL programming language.
APL is a programming language introduced in Kenneth Iverson’s Turing award-winning paper titled “Notation as a tool of thought”. I came across this paper in a compiler class I took during graduate school. As a part of the class, we had to build an APL2C compiler that generated C kernels for various APL expressions. While working on the project, I started aligning with the corner of the programming community that rallied behind APL as a reasonable programming language :). As such, it must be noted that there are a ton of open-source APL compilers; however, the most widely used APL compiler, Dyalog, is not open-source but free.
If you’re interested in building an APL compiler, I would recommend this resource, as it covers the language in great detail. However, if you’re just here for the LLVM bits, some of my not-so-complete explanation should get you by. Throughout this tutorial, we’ll build the APL compiler to match APL’s functionality as outlined in the resource above. We’ll build the compiler in C++.
This blog post splits the process of writing a compiler into four stages, the completed code at each stage is available on seperate GitHub branches as indicated below
| SNo. | Stage | GitHub branch |
|---|---|---|
| 1 | Lexer and Parser | stage1/lexer-parser |
| 2 | AST Construction | stage2/ast-construct |
| 3 | LLVM Codegen | stage3/llvm-codegen |
| 4 | JIT Compiler | stage4/jit-compiler |
| 5 | Bonus | stage5/bonus |
Quick APL Primer#
APL was not originally intended to be a programming language. It would be more appropriate to call it a set of notations that can be strung together to express algorithms. APL programs consist of a combination of numeric literals and operator symbols (and a few other things that we’ll conveniently ignore). APL has around 30 operator symbols, most of which are overloaded to imply different meanings when used in monadic or dyadic contexts. Below, we enumerate some APL basics ahead of our discussion on how we built a compiler for it.
- Comments: Comments in APL always start with the lamp symbol
⍝. - Arrays: All numerical literals are assumed to be arrays. Separating numerical literals by space allows us to construct a 1D array of multiple elements.
>> 1 [ 1 ] >> 1 2 3 [ 1 2 3 ] ⍝ Negative numbers are prefixed with the high minus (¯) specifier. >> 1 ¯2 3 [ 1 -2 3 ] - Monadic Operators: Monadic operators are those that act upon a single operand. Monadic operators always have their operand listed to the right. APL consists of numerous monadic operators, but we will restrict our analysis to the negate (
-) and index generator (⍳) operators.>> - 1 ¯2 3 [ -1 2 -3 ] ⍝ The operator generates an array with data [ 1, 2, ...operand ] >> ⍳5 [ 1 2 3 4 5 ] - Dyadic Operators: Dyadic operators are those that act upon two operands on either side of the operator. APL consists of numerous dyadic operators, but we will restrict our analysis to the add (
+), subtract (-), multiply (x), divide (÷), and reshape (⍴) operators. Note how the negate monadic operator and the subtract dyadic operator use the same symbol.>> 1 2 3 + 1 2 3 [ 2 4 6 ] >> 1 2 3 - 1 2 3 [ 0 0 0 ] >> 1 2 3 x 1 2 3 [ 1 4 9 ] >> 1 2 3 ÷ 1 2 3 [ 1 1 1 ] ⍝ The left hand side indicates the target shape ⍝ and right side indicates the data. >> 2 2 ⍴ 1 2 3 4 [[1 2], [3 4]]
The compiler we build will be limited to just these APL features since that simplifies implementation significantly.
Stage 1: Lexer and Parser#
Parsing is the process of converting a string of characters that form a program into some logical representation we can analyse. The logical representation in this case is an abstract syntax tree, but we’ll get to that in the next section. When it comes to parsing, we have several options. I wrote my first compiler using the Lex/YACC parser generator, but Flex/Bison are a little more popular than those variants because they are free and open source. I will note that whether you use a parser generator is up to you; many folks prefer to write their own parsers for the languages they build, but for this tutorial, I will use Flex/Bison. You may find this introduction to Flex and Bison useful as a reference. If you decide to work with Flex/Bison, use your machine’s package manager to install both tools.
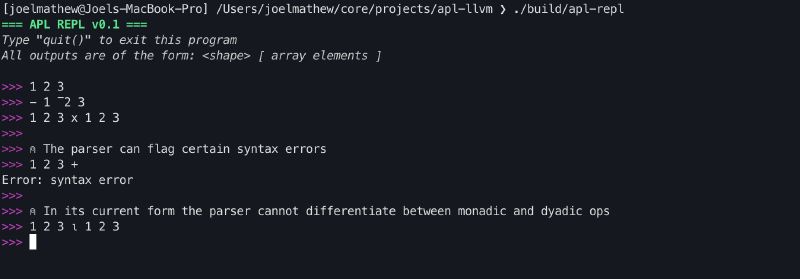
At the end of this section, we will have an interface capable of parsing APL programs and flagging certain classes of syntax errors.
Bison#
Bison is a parser generator that takes a grammar description as input and generates C/C++ parser code that adheres to that grammar. Naturally, the follow-up question here is: what is grammar?
A grammar is a description of the syntax of a language. Grammars consist of a set of production rules that can be recursively applied to a sequence of terminal tokens to generate a parsing tree. Each rule consists of tokens that can be either terminal or non-terminal.
- Terminal Tokens: These tokens do not expand further and hence occur only on the RHS of a rule. We represent these tokens with uppercase characters.
- Non-Terminal Tokens: these tokens are expected to expand further and can therefore occur on either the RHS or the LHS of a rule. We represent these tokens with lowercase characters.
Our limited APL language has a very simple grammar, as shown below.
| |
- This grammar description has 5 terminal tokens:
INPUT_COMPLETED,EXIT,OPERATOR,HIGH_MINUS, andLITERAL. - Lines 12-15 indicate that an array can be a single positive or negative number or a collection of positive and negative numbers. It is important to note that we can obtain recursive behaviour by using the same non-terminal token on either side of the rule.
- Lines 7-10 indicate that an operation expression can be monadic or dyadic. Due to the recursive usage of the op_expr non-terminal token, we get the capability of composing operations together.
- Line 5 indicates that a valid APL program is any op_expr. The intent of having a separate rule here is so that if we decide to extend APL to support some of its other features we can append to the rule with or conditions here.
- Lines 1-3 indicate that
EXITshould result in the termination of the program, andINPUT_COMPLETEDshould stop the parser from looking for more inputs.
To generate the parser from the grammar description (parser.y), run the following command
bison -o parser.tab.c --defines=parser.tab.h parser.y
Flex#
The parser’s role is to group a stream of terminal tokens into a syntactically valid program, but how do we go from a character stream to a terminal token stream?
The lexer is responsible for that. Flex is a lexer generator that converts a character stream into terminal tokens using a series of string-matching rules.
| |
- Lines 1-2 indicate that we should ignore all comments, spaces, and tabs in the character stream.
- Lines 4-17 indicate rules for the five non-terminal tokens. The curly braces indicate the action to be performed on a match.
- It may be noted that line 8 returns
*yytext. That is a special variable that points to the character stream that was just matched. yylval->emplace<float>(std::stod(yytext));on the other hand, is used for when we want to return an explicit token but want the token to carry with it a particular value. In this case, we want the literal token to carry with it the floating-point number it captured.- Due to a Flex limitation we cannot return unicode characters using
yytextandyylval, hence we create seperate rules for each operator. In the next section, we’ll update each rule to return a specific enum value for the matched symbol.
- It may be noted that line 8 returns
- Line 19 is a catch-all for any character that cannot be converted to a valid token in the program.
To generate the lexer from the above description (lexer.l), run the following command
flex -o lexer.yy.c lexer.l
REPL Interface#
REPL stands for Read-Eval-Print-Loop. REPL interfaces stay true to their name: they read an input, evaluate the result, print it, and repeat. In this tutorial, we’re building a JIT compiler that is exposed via a REPL interface.
The REPL interface is straightforward. It uses a couple of ANSI codes to print a pretty header when our program launches, then starts a while loop to accept user input for parsing.
int main() {
  cout << "\033[1;32m=== APL REPL v0.1 ===\033[0m\n";
  cout << "\033[3;37mType \"quit()\" to exit this program\033[0m\n";
  cout << "\033[3;37mAll outputs are of the form: <shape> [ array elements "
          "]\033[0m\n\n";
  AplLexer lexer;
  yy::parser parser(lexer);

  while (true) {
    cout << "\033[35m>>>\033[0m ";
    parser();
  }

  return 0;
}
Putting it together#
Once you put together all of the above code, you can use a build system like CMake to have the project build in a single command as opposed to running the flex/bison commands each time before compiling. After adding a CMakeLists.txt similar to this one. You should be able to have your project compile with the following commands.
cmake -B build
cmake --build build/ --target apl-repl
./build/apl-repl
I skipped a few details here to make the article a little shorter. But one key component you will notice is that we need both Flex and Bison to generate C++ code. This creates a few complications, so we’ll need to add some boilerplate to make it work properly. There is an excellent explanation of what needs to be done and why in this SO post. For anyone wondering why we cannot simply generate C code here, the answer is that we need the parser to store values in variant format (as opposed to unions, which are the only supported type in C) so that we can use smart pointers.
Stage 2: AST Construction#
Now that we have a functioning lexer and parser, we can use them to convert an APL program into a format we can process more easily. That format is generally referred to as an Abstract Syntax Tree (AST). An AST does not have a fixed structure. You would need to build a different one for each language you wish to compile.
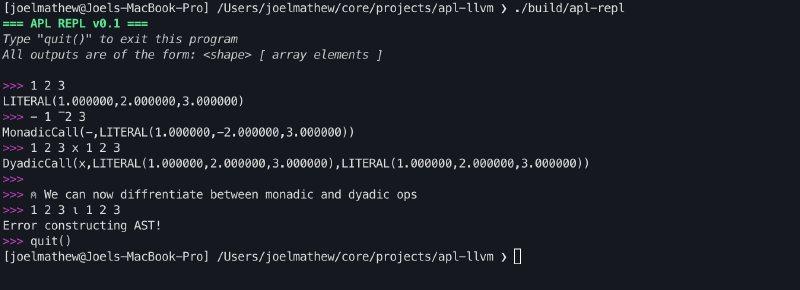
At the end of this section, we will have an interface that can parse APL programs and print their abstract syntax trees.
Node Classes#
For the limited APL language we are considering in this tutorial, our AST needs to support just three types of nodes.
- Literal: To store arrays
- MonadicCall: To store monadic operations
- DyadicCall: To store dyadic operations
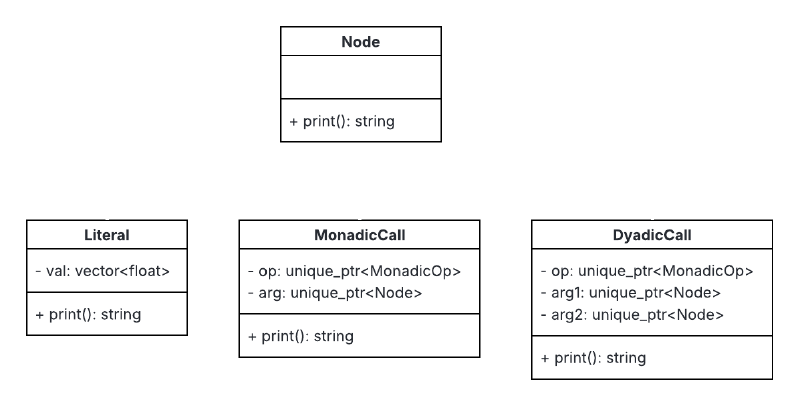
The class methods can be implemented as follows. The tree aspect of this class lies in the fact that arg can be a literal, monadic op or dyadic op.
DyadicCall::DyadicCall(unique_ptr<AplOp::DyadicOp> op, unique_ptr<Node> arg1,
                       unique_ptr<Node> arg2)
    : op(std::move(op)), arg1(std::move(arg1)), arg2(std::move(arg2)) {}

const string DyadicCall::print() const {
  return "DyadicCall(" + this->op->print() + "," + this->arg1->print() + "," +
         this->arg2->print() + ")";
}
Op Classes#
The op field in the call classes above can be of MonadicOp or DyadicOp type.
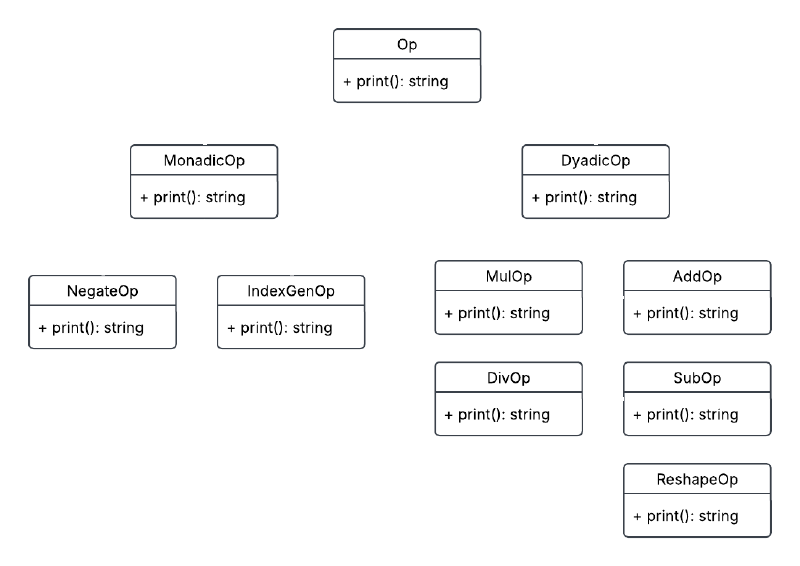
The grammar treats all operators as one OPERATOR token. We can distinguish between operators by having the lexer return a Symbol enum as the yylval and then have the parser run the symbol through createMonadicOp() / createDyadicOp() to generate an instance of the Op class of appropriate type.
enum Symbol { PLUS, MINUS, TIMES, DIVIDE, IOTA, RHO };

unique_ptr<AplOp::DyadicOp> createDyadicOp(Symbol op) {
  switch (op) {
  case Symbol::PLUS:
    return make_unique<AplOp::AddOp>();
  ...
  default:
    throw std::logic_error("Specified dyadic operation is unimplemented!");
  }
}

const string AddOp::print() const { return "+"; }
Putting it together#
Now that we have the necessary classes, we update the grammar to create AST nodes during the recursive application of the production rules. We additionally modify the parser to accept unique_ptr<Node> astRetPtr as input so that we can assign the result to it. We then modify the REPL program to print the AST to the console.
start: prgm INPUT_COMPLETED {astRetPtr = std::move($1); YYACCEPT;}
    | INPUT_COMPLETED       {YYACCEPT;}
    | EXIT                  {exit(0);}

prgm: op_expr           {$$ = std::move($1);}

op_expr: '(' op_expr ')'        {$$ = std::move($2);}
    | OPERATOR op_expr          {$$ = AplAst::MonadicCall::create($1, $2);}
    | op_expr OPERATOR op_expr  {$$ = AplAst::DyadicCall::create($2, $1, $3);}
    | array                     {$$ = std::move($1);}

array: array LITERAL                {$$ = AplAst::Literal::create($1->getVal(),$2);}
    | array HIGH_MINUS LITERAL      {$$ = AplAst::Literal::create($1->getVal(),-1*$3);}
    | HIGH_MINUS LITERAL            {$$ = AplAst::Literal::create(-1 * $2);}
    | LITERAL                       {$$ = AplAst::Literal::create($1);}
Stage 3: LLVM Codegen#
At the end of the previous stage, we successfully converted a stream of characters into an AST. In this stage, we’ll look at how we can lower the AST into LLVM IR.
At the end of this section, we will have an interface that can parse APL programs and print the corresponding LLVM IR.
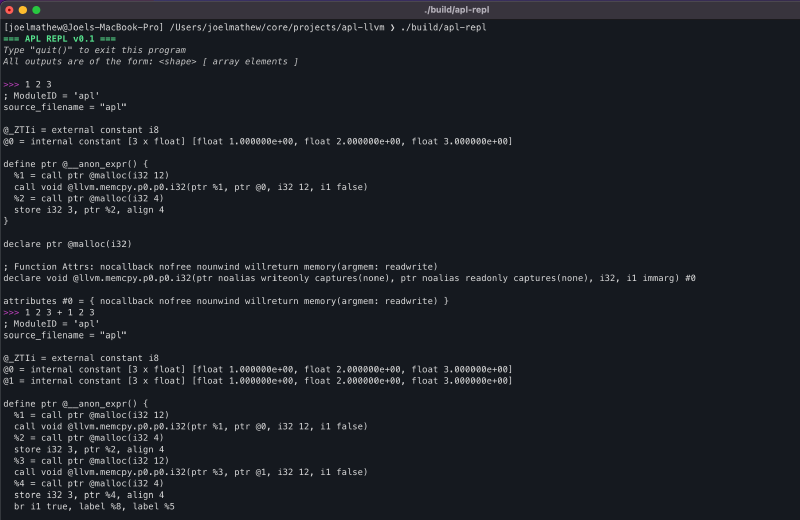
CodegenManager#
To help organize the code, I created this class to house all codegen-specific functionality.
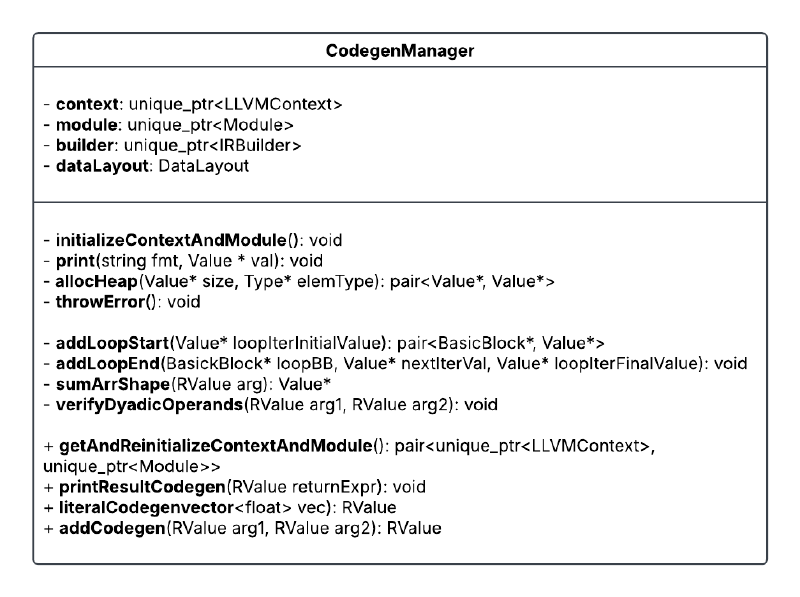
The properties of this class are as follows.
- context: LLVM object that maintains a global context for code generation.
- module: Top-level container for the input program. It contains functions, global variables, and symbol table entries.
- builder: LLVM IR builder object that can be used to issue instructions during codegen within basic blocks.
- dataLayout: Specifies how data should be laid out in memory (ref).
The initializeContextAndModule() function initializes the above fields, and the getAndReintializeContextAndModule() allows us to retrieve the module and context for compilation while reinitializing the fields for the next code generation.
Apart from initializing the module and context, we also generate the IR for an LLVM function that will contain all the generated code. As mentioned earlier, functions are a collection of basic blocks. Basic blocks are simply a sequence of LLVM IR instructions that are executed serially. The builder can be configured to insert code into a specific basic block using the builder->SetInsertPoint function. The use of multiple basic blocks will be clarified further when we discuss loops.
  FunctionType *FT = FunctionType::get(this->builder->getPtrTy(),
                                       std::vector<Type *>(), false);
  Function *F =
      Function::Create(FT, Function::ExternalLinkage,
                       "__anon_expr", this->module.get());
  BasicBlock *BB = BasicBlock::Create(*this->context, "", F);
  this->builder->SetInsertPoint(BB);
RValue#
One of the most important aspects of writing a compiler is knowing what information is available at compile time and what will only be available at runtime. For the APL compiler we are building now, consider the following cases.
- Case 1 (compiling
1 2 3 + 1 2 3): It would be easy to generate code for this expression if, within the AST, we stored the shapes of the literals. Because then we can have the codegen function loop over three elements and perform the addition. - Case 2 (compiling
(2 2 ⍴ 1 2 3 4) + (2 2 ⍴ 5 6 7 8)): Here, unfortunately, we cannot guess the shape of the LHS and RHS without computing the expression, and hence we will not know till runtime what the shape of the two operands is going to be.
To account for Case 2, our codegen function must be generic enough to support all cases. To achieve that, we need a way to access the array’s shape at runtime. Since we’re going to be doing this in LLVM IR, which is assembly-like, we’ll need three things.
- resultPtr: A pointer to the actual data in the array
- shapePtr: A pointer to a 1D array where each element indicates a component of the shape (i.e.,
[1 2 3] => 1x2x3shape). A product of all the elements in this array gives the bounds of the resultPtr array. - shapeLength: The size of the shapePtr array.
We can organize these fields into a class called RValue, which can serve as the type for all input arguments and outputs (see the CodegenManager class diagram above).
class RValue {
  Value *resultPtr;
  Value *shapePtr;
  Value *shapeLength;

public:
  RValue(Value *resultPtr, Value *shapePtr, Value *shapeLength);
  Value *getResultPtr();
  Value *getShapePtr();
  Value *getShapeLength();
};
Dyadic Add#
Performing an addition operation on two arrays involves the following steps.
- Verify that the two arguments are of the same shape
- Allocate space for the result
- Loop through elements in the array and perform the addition.
The following code is the body of the AddCodegen function, with steps 1 and 2 and the loops in step 3 abstracted away. Lines 13-34 describe the body of the loop and contain four distinct types of statements.
builder->CreateLoad: This adds a load instruction into the basic block. All values in memory must first be loaded into a register before they can be used for processing. The load API call requires a reference to the memory location from which the load should occur.builder->CreateGEP: TheGEPis an acronym forgetelementptr, which allows us to perform pointer arithmetic, to get offsets from base memory location based on the iterator value in a loop.builder->CreateFAdd: Generates code for floating-point addition of two input registers and assigns the output to a new register.builder->CreateStore: Generates code to store the register value in a specific memory location.
| |
Loops#
Since we will use many loops during the codegen process, it might be best to abstract this functionality into a separate function and call it as needed. We create two functions, addLoopStart and addLoopEnd, for this purpose.
When creating loops, we need to consider a few things.
- Every time a loop is instantiated, we create two new basic blocks:
LoopBBandAfterLoopBB. The former is the block that contains the loop body, and the latter is the block of code that executes after the loop completes. - To control loop exit, we use an iterator in the loop. However, due to LLVM’s SSA constraint, we cannot update the iterator register in place, so we always start the loop by loading the iterator value from memory and end it by writing the new value back to the same location. Since we need a memory location for this, we use the
builder->CreateAllocafunction, which reserves a memory location on the stack. - At the end of the loop, we use
builder->CreateCondBrto decide whether to exit the loop or move control back to the top of the loop body basic block.
pair<BasicBlock *, Value *>
LlvmCodegen::addLoopStart(Value *loopIterInitialValue) {
  // Allocate space to store the value of the iterator
  AllocaInst *alloca =
      this->builder->CreateAlloca(Type::getInt32Ty(*this->context), nullptr);
  builder->CreateStore(loopIterInitialValue, alloca);

  // Unconditional entry to loop block with builder set to insert instructions
  // there
  Function *func = this->builder->GetInsertBlock()->getParent();
  BasicBlock *LoopBB = BasicBlock::Create(*this->context, "", func);
  this->builder->CreateBr(LoopBB);
  this->builder->SetInsertPoint(LoopBB);
  return make_pair(LoopBB, alloca);
}

void LlvmCodegen::addLoopEnd(BasicBlock *loopBB, Value *nextIterVal,
                             Value *loopIterFinalValue) {
  Value *endCond = builder->CreateICmpULT(nextIterVal, loopIterFinalValue);

  // Create a block for execution after the loop and test if the end condition
  // is satisfied.
  Function *func = this->builder->GetInsertBlock()->getParent();
  BasicBlock *AfterLoopBB = BasicBlock::Create(*this->context, "", func);
  this->builder->CreateCondBr(endCond, loopBB, AfterLoopBB);
  this->builder->SetInsertPoint(AfterLoopBB);
}
Allocating Memory#
When performing any operation, we’ll need to reserve space for the result, and that needs to come from the heap. We add support for that by using module->getOrInsertFunction to insert the definition of the malloc function so that we can call it to reserve space in memory for a particular type.
pair<Value *, Value *> LlvmCodegen::allocHeap(Value *size, Type *elemType) {
  FunctionCallee mallocFunc = this->module->getOrInsertFunction(
      "malloc", this->builder->getPtrTy(),
      Type::getInt32Ty(*this->context));

  uint64_t elementSize =
      this->module->getDataLayout().getTypeAllocSize(elemType);

  Value *totalSize = builder->CreateMul(
      ConstantInt::get(Type::getInt32Ty(*this->context), elementSize), size);

  return make_pair(this->builder->CreateCall(mallocFunc, totalSize), totalSize);
}
Being able to reference external functions this way saves us time from having to reimplement things from scratch. In a similar way, we can use the __cxa_throw function to get the throw functionality.
throwError(), verifyDyadicOperands(), print(), and printResultsCodegen().Putting it together#
To call the codegen functions created in the earlier subsections, we will need to add a codegen() method to each AST node that calls the corresponding method defined above.
AplCodegen::RValue AddOp::codegen(AplCodegen::LlvmCodegen *codegenManager,
                                  AplCodegen::RValue lhs,
                                  AplCodegen::RValue rhs) {
  return codegenManager->addCodegen(lhs, rhs);
}

AplCodegen::RValue
DyadicCall::codegen(AplCodegen::LlvmCodegen *codegenManager) {
  return this->op->codegen(codegenManager, this->arg1->codegen(codegenManager),
                           this->arg2->codegen(codegenManager));
}
We will also have to update the REPL code to instantiate the CodegenManager and call the module print function.
...
auto codegenManager = make_unique<AplCodegen::LlvmCodegen>();
while (true) {
  ...
  if (astRetPtr != nullptr) {
    auto llvmIr = astRetPtr->codegen(codegenManager.get());
    auto [context, module] =
        codegenManager->getAndReinitializeContextAndModule();
    module->print(errs(), nullptr);
    astRetPtr = nullptr;
  }
}
...
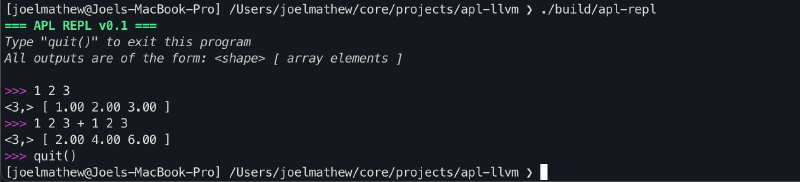
Stage 4: JIT Compiler#
Now that we have generated the LLVM IR, we need to set up a JIT compiler to process it and produce a result. LLVM provides ORC JIT APIs. These are the APIs used in the JIT compiler implemented in the LLVM Kaleidoscope tutorial. We can use the same compiler here to compile our LLVM IR.
After adding the JIT compiler, the REPL interface will be functional and capable of performing array addition.
Closing Thoughts#
Congratulations on getting to the end of the blog post! I really appreciate you taking the time to sift through this rather long article, and I hope this helped inform your understanding of compiler development and LLVM. For anyone starting to work with LLVM, the docs can be intimidating, so I recommend using an LLM to point you in the right direction. Due to the RAG nature of these systems, they are probably the easiest way to search through the docs; however, try not to rely on the LLM outputs entirely and instead go to the docs it references to get what you want. It can help make the learning process more fulfilling.
I just wanted to close by saying that building a compiler was one of the first complex coding projects I undertook during my undergrad, and I really enjoyed it. The structure of this tutorial is actually heavily inspired by the roadmap used for that undergrad project. I hope this tutorial sparked some curiosity in you to write your own compiler, and hopefully you learned a few things along the way, too. This is also my first blog post on this page, so I expect this article to be a little rough around the edges. I hope to improve that over time, so if you have any feedback on what I can do better, please shoot me an email!
References#
- https://dl.acm.org/doi/abs/10.5555/977395.977673
- https://web.stanford.edu/class/archive/cs/cs143/cs143.1128/handouts/050%20Flex%20In%20A%20Nutshell.pdf
- https://web.stanford.edu/class/archive/cs/cs143/cs143.1128/handouts/120%20Introducing%20bison.pdf
- https://llvm.org/docs/LangRef.html
- https://llvm.org/docs/tutorial/MyFirstLanguageFrontend/index.html
- https://llvm.org/docs/ORCv2.html
- https://github.com/DSLs-for-HPC/APL2C